How to Add Facebook Pixel Tracking to Your Shopify Checkout Page

How to Add Facebook Pixel Tracking to Your Shopify Checkout Page

September 2, 2024

Implementing Facebook Pixel on your Shopify store is essential for tracking and optimizing your ad performance. This guide will walk you through the process of adding custom event tracking using Facebook Pixel to various key events in your Shopify checkout flow.

Step 1: Get Your Facebook Pixel ID

First, you’ll need your Facebook Pixel ID. If you haven’t created a Pixel yet, you can do so through Facebook Ads Manager.

Step 2: Access Shopify Settings

  • Log in to your Shopify admin panel.
  • Go to Settings
  • Scroll down to the ‘Customer Events’
  • Add Customer events and give any name
  • Go to code section and place below code
  • Then click on Connect at the top of the page

Facebook pixel tracking at checkout

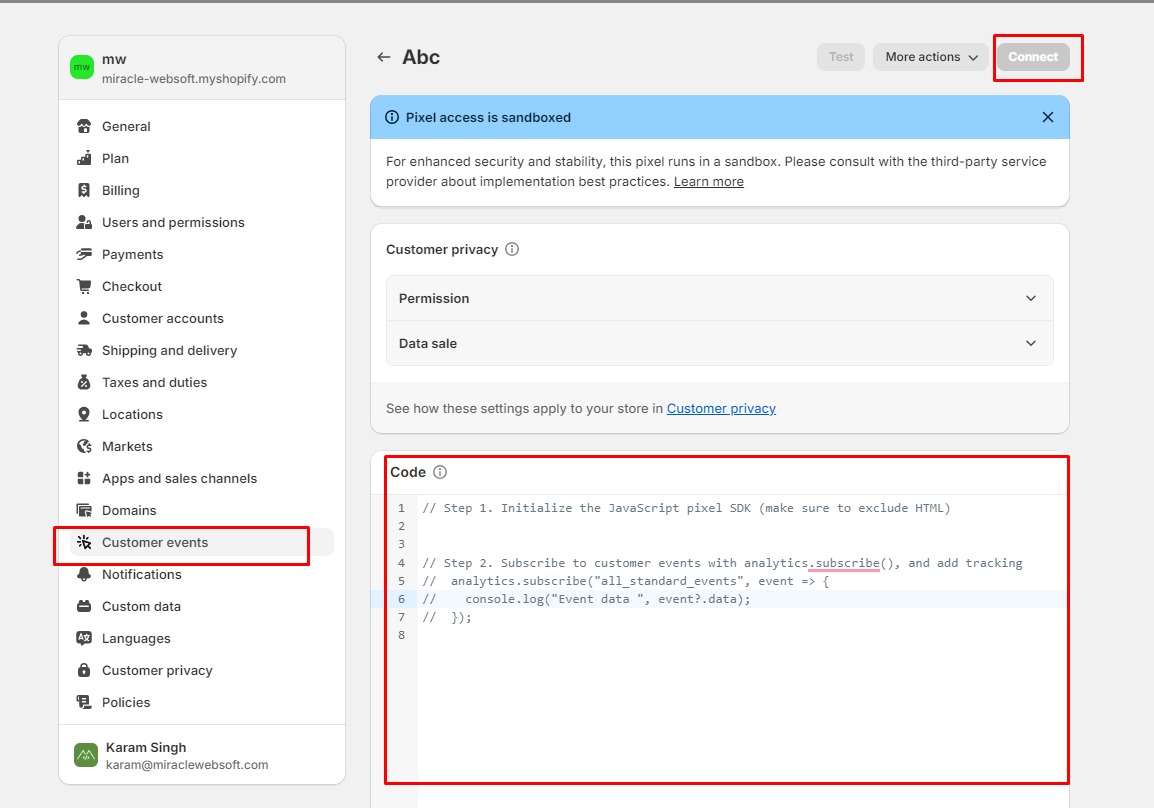
Copy and paste the following code into the ‘Code’ box. Replace YOUR_PIXEL_ID with your actual Facebook Pixel ID:

!function(f,b,e,v,n,t,s)
{if(f.fbq)return;n=f.fbq=function(){n.callMethod?
n.callMethod.apply(n,arguments):n.queue.push(arguments)};
if(!f._fbq)f._fbq=n;n.push=n;n.loaded=!0;n.version='2.0';
n.queue=[];t=b.createElement(e);t.async=!0;
t.src=v;s=b.getElementsByTagName(e)[0];
s.parentNode.insertBefore(t,s)}(window, document,'script',
'https://connect.facebook.net/en_US/fbevents.js');

// replace YOUR_PIXEL_ID with the pixel ID provided by third-party
fbq('init', YOUR_PIXEL_ID);

// integrate third-party pixel tracking
analytics.subscribe("page_viewed", (event) => {
  fbq('track', 'PageView');
});

analytics.subscribe("product_viewed", (event) => {
  fbq('track', 'ViewContent', {
    content_ids:  [event.data?.productVariant?.id],
    content_name: event.data?.productVariant?.title,
    currency: event.data?.productVariant?.price.currencyCode,
    value: event.data?.productVariant?.price.amount,
  });
});

analytics.subscribe("search_submitted", (event) => {
  fbq('track', 'Search', {
    search_string: event.searchResult.query
  });
});

analytics.subscribe("product_added_to_cart", (event) => {
  fbq('track', 'AddToCart', {
    content_ids: [event.data?.cartLine?.merchandise?.productVariant?.id],
    content_name: event.data?.cartLine?.merchandise?.productVariant?.title,
    currency: event.data?.cartLine?.merchandise?.productVariant?.price?.currencyCode,
    value: event.data?.cartLine?.merchandise?.productVariant?.price.amount,
  });
});

analytics.subscribe("payment_info_submitted", (event) => {
  fbq('track', 'AddPaymentInfo');
});

analytics.subscribe("checkout_started", (event) => {
  fbq('track', 'InitiateCheckout');
});

analytics.subscribe("checkout_completed", (event) => {
  fbq('track', 'Purchase', {
    currency: event.data?.checkout?.currencyCode,
    value: event.data?.checkout?.totalPrice?.amount,
  });
});

Step 3: Review and Save Changes

  1. Double-check the code for any errors.
  2. Once verified, click the ‘Save’ button.

Step 4: Verify Your Events

Use the Facebook Pixel Helper Chrome extension to verify that the events are correctly set up and firing when you complete the respective actions (like viewing a product, adding to cart, or making a purchase).

By following these steps, you can successfully track customer interactions through Facebook Pixel on your Shopify store. This will provide valuable insights to optimize your marketing campaigns effectively.

Share This Story, Choose Your Platform!

Lets Discuss On Your Store